Supplies:

- 21cm (8 inch) rattan hoop
- 8cm (3 inch) rattan or metal craft ring
- Craft feathers (you'll need seven large feathers and about 20 small ones)
- Wooden beads in varying sizes - I used beads 7mm (a quarter inch) to 2cm (three quarters of an inch) in diameter
- 8 skeins of Perle 5 thread in complementary hues
- Scissors
- Craft glue (not shown)
1. Cover the Hoop
Step 1
We are going to cover the whole rattan hoop by winding thread around it. Start by laying the end of the thread along the hoop and holding it with your thumb. Then wind the thread around and around the hoop, wrapping over and covering the tail. Continue winding the thread around the hoop until you've covered at least a third of the hoop.
Step 2
To change colours, simply lay the end of the new thread along the hoop and hold it in place while you wrap over it.

Continue to change colours to create a pattern around the hoop.
Step 3
When the hoop is covered, set it aside without tying off the end of the thread.2. Cover the Smaller Ring
Step 1
Wrap the entire ring using the same technique as the hoop.

3. Join the Hoop to the Ring
Step 1
Place the ring inside the hoop and wind the tail from the ring up and around the hoop and back around the ring in a figure 8. Then wind it back around the hoop and tie a double knot close to the hoop.

Step 2
Now using the tail from the hoop, begin to join the hoop and the ring together, winding in a figure 8. Continue all the way around the hoop.

Step 3
When you are happy with the way it's looking and there are no big holes, tie the thread in a double knot around the hoop and trim off the tail.

4. Add the Fringe
Step 1
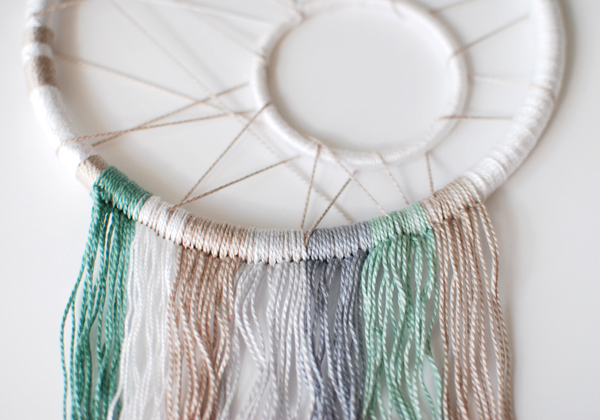
Cut lengths of thread 80cm (32 inches) long to make the fringe. My craft projects usually evolve and change as I'm working on them, so the photos sometimes don't match the instructions exactly!I initially cut four lengths of thread in six colours to make the fringe (and took the photo below). Then as I started to attach them I realised that I needed more of each colour. I ended up using eight lengths of five different colours, and 16 lengths of one colour.

Step 2
Tie one length of thread on at a time starting with the colour that will be in the centre. Fold the thread in half and pass it under the bottom of the hoop. Bring the folded end up through the hoop and pass the tails through the folded end.Pull the knot tight so it's at the bottom of the hoop and the thread hangs down.


Step 3
Add each additional colour to the left of the centre. Make sure you keep the threads as parallel and untangled as you can.

5. Trim the Fringe
Step 1
Take a piece of office paper and fold one corner over to meet the opposite edge, forming a triangle. Cut along the folded line.
Step 2
Lay the dreamcatcher on your work surface and comb the fringe with your fingers so it's laying straight. Place the triangle on top of the fringe to use as a cutting guide.
Another way to do this is to run a line of tape on the thread parallel to the bottom edges of the triangle. Then just cut the tape off.


6. Attach the Large Feathers
Step 1
Arrange the large feathers according to size, with the longest one in the centre to the smallest on the outside.
Feathers, thread and glue are a tricky mix, so be careful to use the glue sparingly and keep a damp cloth close by to wipe your fingers. Keep the glue away from the fringe or things could quickly go pear shaped!


7. Attach the Beads and Small Feathers
Step 1
Arrange the feathers according to size. Place a small amount of glue on the top of a feather and thread a bead onto it, making sure you leave at least a centimetre (half an inch) of the feather showing at the top. Repeat for all the feathers, keeping them grouped according to size.
Step 2
Starting with the larger feathers, attach them to the fringe so they are evenly spaced out.
Step 3
Progressively add the rest of the small feathers to the fringe. To avoid a gluey, feathery mess, pull individual threads out to the side before you glue the feathers on.

8. Make a Hanging Loop
Step 1
Cut a length of thread about 26cm (10 inches) long, fold it in half and tie a knot in the end.Thread the folded end through a large bead.


Hang Your Dreamcatcher
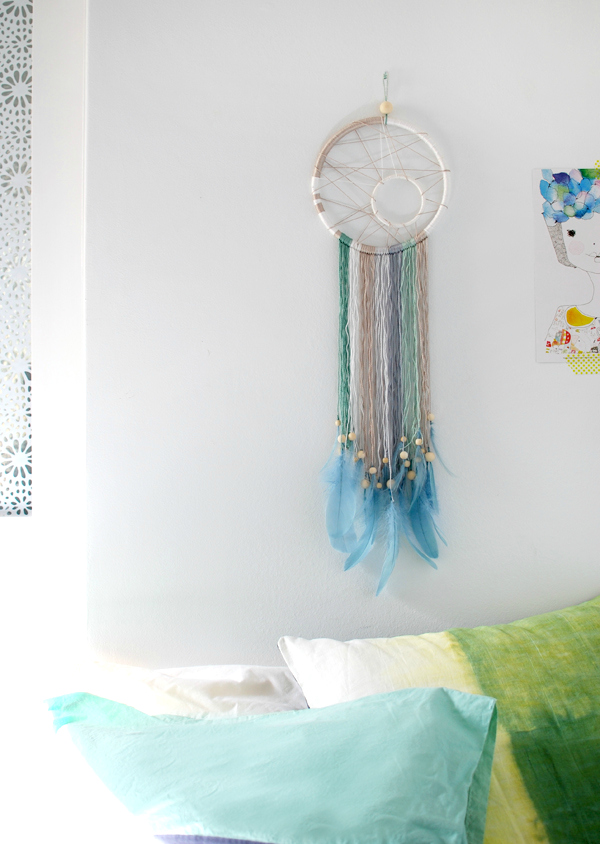
Sweet dreams!In this tutorial, you learned how to create a modern spin on a traditional dreamcatcher, using a variety of wrapping techniques. You also learned how to cut the fringe and attach individual feathers to each thread.
You could experiment with additional beads in the centre of the dreamcatcher, as well as different colourways.

Tidak ada komentar:
Posting Komentar